Authenticate Desktop and Mobile App Users for FamilySearch Access
Desktop and mobile app users can authenticate with FamilySearch in order to access FamilySearch data. If the app is qualified to use a refresh token, then the authorization can be kept active for two weeks.
Assumptions
- You have an existing FamilySearch user account.
Programming Step
- Obtain the user name and password. This can be done by inquiring of the user or using a name and password that your app has stored.
- Display a permission request statement and obtain permission from the user.
- Call the Access Token API resource. Specify the grant_type as "password" and provide the user name and password parameter values.
The user is authenticated when an access token is successfully returned to the app. This access token is then used as a parameter for all subsequent FamilySearch API resource requests.
User Interface Suggestions
- Prompt the user for a FamilySearch user name, password, and display a permission statement.
The user enters a user name and password and reviews the permission statement. - The user clicks LOGIN or CANCEL.
The app requests and receives an access token, or cancels the login. - Proceed with the functionality of your app.

Authenticate Web App Users for FamilySearch Access
Users of Web apps can authenticate with FamilySearch in order to access FamilySearch Family Tree data. If the app is qualified to use a refresh token, then the authorization can be kept active for two weeks.
NOTE: It is a best practice for web applications not to store cached data in local memory storage, and to purge cached data at the end of each authorized session and whenever the back button is used.
This process of authentication is complete when an access token is obtained.
Assumptions
- You have an existing FamilySearch user account.
Programming Steps
- Call the Authorization API. resource. Provide a redirect URI parameter value such as http://localhost. The user is directed to the FamilySearch sign in page to provide FamilySearch access credentials (user name and password). An authorization code is sent back to the app.
- Call the Access Token API resource. Specify the grant_type as "authorization_code" and place the authorization code you just retrieved as the code parameter value.
The user is authenticated when an access token is successfully returned to the app. This access token is then used as a parameter for all subsequent FamilySearch API resource requests.
User Interface Suggestions
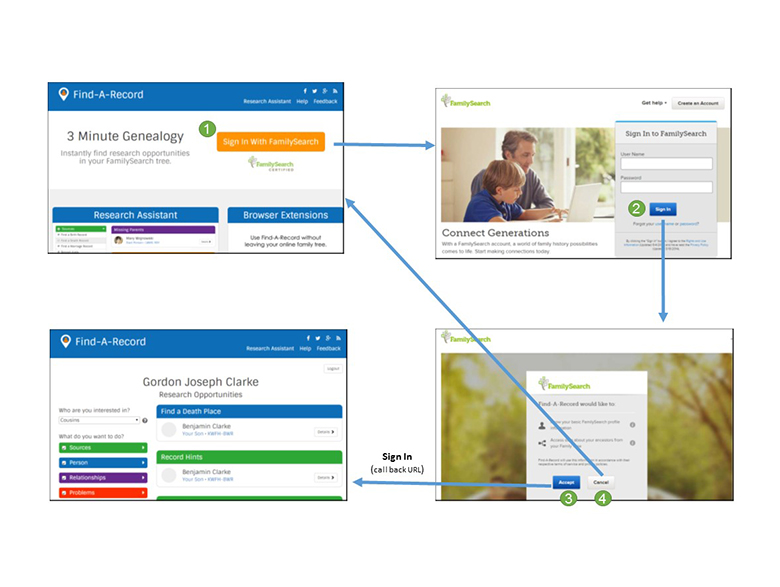
- Prompt the user to sign in with FamilySearch.
The user clicks the Sign In with FamilySearch button and the app calls the authorization API which goes to the FamilySearch Sign In page. - The user provides user name and password and clicks the Sign In button.
FamilySearch presents the user with the Permission Page to accept or cancel the transfer of FamilySearch profile and ancestors data to the app. - If the user clicks the Accept button, the user is authorized and the app goes to the redirect URI with an authorization code.
The app calls the Access Token API to obtain an access token. Authentication is complete. - If the user clicks the Cancel button, the app goes to the redirect URI with the return string "error=access_denied&error_description=User+declined+consent". An authorization code is not included and authentication cannot be established. The application should present an appropriate response to the user.
The following screen shots are for a company called FindARecord.com.